


TL;DR
Voice is the most natural way humans interact with each other daily. We speak to communicate, give instructions, and express emotions, and we effortlessly understand one another’s speech.
For as long as humanity has existed, voice has been our primary means of communication. Now, this mode of interaction is shaping the way we interact with computers. Over the years, speech understanding and generation advancements have transformed human-computer interactions. The latest voice models from OpenAI are a testament to how far speech AI has evolved.
But beyond simple interactions, can we push the boundaries of these powerful voice capabilities even further?
The answer is yes. By combining advanced voice technology with the agentic capabilities of Large Language Models (LLMs), we can create something more: Voice Agents.
Voice Agents are AI models that combine agentic reasoning with advanced voice capabilities. These agents can understand speech just like we do, perform actions based on spoken instructions, and respond naturally to users.
In this article, we will build a Voice Agent using the OpenAI Agent SDK. By the end, you will learn:
The key components of a Voice Agent
How to use the OpenAI Agent SDK and extend it with voice capabilities
The concepts of Voice Workflows and Voice Pipelines within the SDK
A quick primer on Voice Agent
A typical AI agent operates by taking instructions in the form of a prompt. The LLM then decides on the appropriate tool or action to perform. Once the action is completed, the agent responds to the user via text.

A Voice Agent follows the same process but with additional speech-processing components. First, a speech-to-text (STT) model converts spoken input into text. The transcribed text is then passed to an LLM, which processes the instructions and generates a response.

Instead of simply returning text, however, the output is sent to a text-to-speech (TTS) model, which converts it back into audio for the user.
This modular, chained approach to building Voice Agents offers flexibility and scalability. Developers can easily swap out individual components when updating or improving the system.
For example, if a Voice Agent was initially built using OpenAI’s Whisper for speech-to-text conversion, but OpenAI later releases a more advanced model like gpt-4o-transcribe, you can seamlessly replace Whisper with the new model.
The same modularity applies to both the LLM and the text-to-speech components, making it easy to upgrade and refine the Voice Agent over time.
The OpenAI Agent SDK
The OpenAI Agent SDK is the production-ready version of OpenAI’s previous research project, OpenAI Swarm. Initially designed to support text-based agents, the SDK has since been enhanced to include voice capabilities, enabling the development of powerful Voice Agents. It provides developers with a robust set of tools to create agents that can understand instructions, leverage various tools, and collaborate with other agents to accomplish complex tasks efficiently.
Components of the OpenAI Agent SDK
The SDK comprises three primary components:
Agents: These are instances of large language models (LLMs) configured with specific instructions and equipped with tools to perform designated tasks. Agents serve as the central entities that process inputs and generate appropriate actions or responses.
Tools: Tools extend the functionality of agents by enabling them to perform actions such as fetching data, executing code, calling external APIs, and interacting with external systems. The SDK supports various types of tools, including hosted tools, function tools, and even other agents acting as tools.
Runner: The Runner is responsible for executing the agent loop. It has access to both the agents and the user inputs. During the agent loop, the agents can perform handoffs (designating tasks to other agents) and use tools, all within the loop.
The Voice AI Workflow
To extend the capabilities of the Agent SDK to support voice, OpenAI introduced two key concepts: the Voice Pipeline and Voice Workflow.

The Workflows
The voice workflow consists of the agent and the tools used during its execution. It primarily expects text input, and the workflow processes this input to generate a text output. In this regard, the voice workflow operates similarly to a standard agent workflow. However, its true power is unlocked when combined with the Voice Pipeline.
The Pipeline
The pipeline encompasses the entire Voice Agent and includes the Speech-to-Text model, the voice workflow, and the Text-to-Speech model. As the name suggests, the pipeline first converts the user’s speech to text using the Speech-to-Text model, then passes it through the workflow, and finally converts the resulting text back into speech using the Text-to-Speech model. The pipeline coordinates all these components, ensuring smooth and seamless operation throughout the Voice Agent's process.
Building the Voice Workflow
In this section, we'll walk through the process of building a voice-enabled workflow using the OpenAI Agent SDK. This involves setting up the necessary dependencies, creating agents and their associated tools, defining the agents, and implementing the workflow that integrates speech-to-text and text-to-speech functionalities.
Installing the Voice Dependencies for Agent SDK
To begin, ensure that you have the OpenAI Agent SDK installed along with the voice dependencies. This can be achieved by running the following command:
pip install 'openai-agents[voice]'
This command installs the Agent SDK along with the necessary components to handle voice functionalities, including speech-to-text and text-to-speech capabilities. For more details, refer to the OpenAI Agents SDK Quickstart Guide.
Creating the Agent's Tool
Agents in the OpenAI Agent SDK can be equipped with tools that extend their capabilities. In this example, we'll create a tool that retrieves the current time in a specified time zone. Here's how you can define this tool:
Python
from datetime import datetime
from zoneinfo import ZoneInfo
from agents import function_tool

@function_tool
def get_time_in_timezone(timezone: str) -> str:
    """
    Given a timezone, this tool returns the current time in that time zone.
    """
    try:
        tz = ZoneInfo(timezone)
        current_time = datetime.now(tz)
        return current_time.strftime("%Y-%m-%d %H:%M:%S %Z%z")
    except ValueError:
        return "Invalid time zone. Please provide a valid time zone name."
In this code:
We import the necessary modules: datetime for handling date and time, and ZoneInfo for time zone conversions.
We define the get_time_in_timezone function and decorate it with @function_tool, making it a tool that agents can use.
The function attempts to create a ZoneInfo object for the given time zone and retrieves the current time in that zone. If the time zone is invalid, it returns an error message.
This tool allows agents to access current time information based on user-specified time zones. For more information on creating tools, see the OpenAI Agents SDK documentation on Tools.
Defining the Agents
With the tool created, we can now define the agents that will use it. In this example, we create two agents: one for general assistance and another for handling Spanish language interactions.
Python
from agents import Agent
from agents.extensions.handoff_prompt import prompt_with_handoff_instructions

# Define the Spanish-speaking agent
spanish_agent = Agent(
    name="Spanish",
    handoff_description="A Spanish-speaking agent.",
    instructions=prompt_with_handoff_instructions(
        "You're speaking to a human, so be polite and concise. Speak in Spanish."
    ),
    model="gpt-4o-mini",
)

# Define the main assistant agent
agent = Agent(
    name="Assistant",
    instructions=prompt_with_handoff_instructions(
        "You're speaking to a human, so be polite and concise. If the user speaks in Spanish, hand off to the Spanish agent."
    ),
    model="gpt-4o-mini",
    handoffs=[spanish_agent],
    tools=[get_time_in_timezone],
)
In this setup:
We import the
Agentclass and theprompt_with_handoff_instructionsfunction.We create
spanish_agentwith specific instructions to interact politely in Spanish.We create the main
agentwith instructions to handle general interactions and delegate Spanish-language interactions tospanish_agent.The
agentis equipped with theget_time_in_timezonetool, enabling it to provide time-related information.
The Actual Workflow
The workflow orchestrates the interaction between speech input, agent processing, and speech output. We define a VoiceAgentWorkflow class that inherits from VoiceWorkflowBase and implements the run method.
Python
from agents import Runner
from agents.voice import VoiceWorkflowBase, VoiceWorkflowHelper
from typing import Callable
from collections.abc import AsyncIterator

class VoiceAgentWorkflow(VoiceWorkflowBase):
    def __init__(self, on_start: Callable[[str], None]):
        """
        Args:
            on_start: A callback that is called when the workflow starts. The transcription
                is passed in as an argument.
        """
        self._input_history: list = []
        self._current_agent = agent
        self._on_start = on_start

    async def run(self, transcription: str) -> AsyncIterator[str]:
        self._on_start(transcription)

        # Add the transcription to the input history
        self._input_history.append(
            {
                "role": "user",
                "content": transcription,
            }
        )

        # Run the agent
        result = Runner.run_streamed(self._current_agent, self._input_history)

        async for chunk in VoiceWorkflowHelper.stream_text_from(result):
            yield chunk

        # Update the input history and current agent
        self._input_history = result.to_input_list()
        self._current_agent = result.last_agent
In this workflow:
The
__init__method initializes the workflow with anon_startcallback, which is invoked at the beginning of the workflow with the transcription text.The
runmethod processes the transcription:It calls the
on_startcallback with the transcription.Adds the transcription to the
input_history.Executes the agent using
Runner.run_streamed, passing theinput_history.Streams the agent's response text using
VoiceWorkflowHelper.stream_text_from.Updates the
input_historyand sets thecurrent_agentfor subsequent interactions.
This workflow integrates the agent's processing capabilities with speech input and output, enabling a seamless voice interaction experience. For more information on workflows, see the OpenAI Agents SDK Workflow Reference.
By following these steps, you've created a voice-enabled workflow that leverages the OpenAI Agent SDK's capabilities to process speech input, interact through agents, and produce speech output.
Building a Real-Time Voice Agent
Now that we have built out the workflow, let's put everything together into a pipeline that will serve as our voice agent.
In this section, we'll guide you through the process of building a real-time voice agent using the OpenAI Agent SDK and the sounddevice library. This agent will capture audio from the microphone, process it through a voice pipeline, and play the response back to the user.
Defining the Attributes
First, we define the necessary attributes for our application, including audio settings and components for audio input and output.
Python
import asyncio
import numpy as np
import sounddevice as sd
from agents.voice import StreamedAudioInput, VoicePipeline
from workflow import VoiceAgentWorkflow

# Constants for audio settings
CHUNK_LENGTH_S = 0.05  # 50ms
SAMPLE_RATE = 24000
FORMAT = np.int16
CHANNELS = 1

class RealtimeCLIApp:
    def __init__(self):
        self.should_send_audio = asyncio.Event()
        self.pipeline = VoicePipeline(
            workflow=VoiceAgentWorkflow(on_start=self._on_transcription),
            stt_model="gpt-4o-transcribe",
            tts_model="gpt-4o-mini-tts"
        )
        self._audio_input = StreamedAudioInput()
        self.audio_player = sd.OutputStream(
            samplerate=SAMPLE_RATE,
            channels=CHANNELS,
            dtype=FORMAT
        )
In this setup:
CHUNK_LENGTH_S: Duration of each audio chunk in seconds.SAMPLE_RATE: Sampling rate for audio recording.FORMAT: Data format for audio samples.CHANNELS: Number of audio channels (1 for mono).RealtimeCLIApp: Main application class that initializes the audio pipeline and input/output streams.
Defining the Methods
Next, we define the methods that handle various aspects of the voice agent's operation. For now, these methods will contain pass statements, indicating that their implementations will be provided later.
Python
class RealtimeCLIApp:
    # ... [Previous code]

    def _on_transcription(self, transcription: str):
        pass

    async def start_voice_pipeline(self):
        pass

    async def send_mic_audio(self):
        pass

    async def run(self):
pass_on_transcription: Callback method invoked when transcription is received.start_voice_pipeline: Initializes and manages the voice pipeline.send_mic_audio: Captures audio from the microphone.run: Main method to run the application.
Working with sounddevice
The sounddevice library allows for real-time audio input and output in Python. It's cross-platform and provides a simple interface for audio streaming.
To install sounddevice, use:
Unset
pip install sounddeviceFor more details, refer to the sounddevice documentation.
Implementing the Methods
Now, we implement the methods defined earlier to handle audio processing and application logic.
The start_voice_pipeline Method
This method starts the audio player and initiates the voice pipeline, processing audio input and output.
Python
async def start_voice_pipeline(self):
    try:
        self.audio_player.start()
        self.result = await self.pipeline.run(self._audio_input)

        async for event in self.result.stream():
            if event.type == "voice_stream_event_audio":
                self.audio_player.write(event.data)
            elif event.type == "voice_stream_event_lifecycle":
                print(f"Lifecycle event: {event.event}")
    except Exception as e:
        print(f"Error: {e}")
    finally:
        self.audio_player.close()
In this method:
Starts the audio player.
Runs the voice pipeline with the audio input.
Processes incoming audio events, playing audio data or handling lifecycle events.
Ensures the audio player is closed after processing.
The send_mic_audio Method
This method captures audio from the microphone and feeds it into the audio input stream.
Python
async def send_mic_audio(self):
    stream = sd.InputStream(channels=CHANNELS, samplerate=SAMPLE_RATE, dtype="int16")
    stream.start()
    read_size = int(SAMPLE_RATE * 0.02)  # 20ms chunks

    try:
        while True:
            if stream.read_available < read_size:
                await asyncio.sleep(0)
                continue

            await self.should_send_audio.wait()
            data, _ = stream.read(read_size)
            await self._audio_input.add_audio(data)
            await asyncio.sleep(0)
    except KeyboardInterrupt:
        pass
    finally:
        stream.stop()
        stream.close()
In this method:
Initializes an input stream to capture audio.
Reads audio data in 20ms chunks.
Waits for the signal to send audio data.
Adds the captured audio to the audio input stream.
Handles cleanup on interruption.
The run Method
The run method manages user input to start/stop recording and to quit the application.
Python
async def run(self):
    print("Press 'K' to start/stop recording, 'Q' to quit.")
    asyncio.create_task(self.start_voice_pipeline())
    asyncio.create_task(self.send_mic_audio())

    while True:
        cmd = await asyncio.to_thread(input)  # Run input in a separate thread
        cmd = cmd.strip().lower()
        if cmd == 'q':
            break
        elif cmd == 'k':
            if self.should_send_audio.is_set():
                self.should_send_audio.clear()
                print("Recording stopped.")
            else:
                self.should_send_audio.set()
                print("Recording started.")
In this method:
Informs the user of available commands.
Starts the voice pipeline and audio capture tasks.
Monitors user input to control recording and exit the application.
Testing the Voice Agent
Now that our Voice Agent is fully set up with both the pipeline and workflow in place, it’s time to test it out.
You can find the complete code here. To run the agent, you’ll need to grab your OpenAI API key and set it as an environment variable:
Unset
export OPENAI_API_KEY=sk-...Our workflow and pipeline will be stored in two files:
workflow.py: contains the workflow logicmain.py: serves as the entry point for running the agent
To launch the program, use the following command:
Unset
python main.pyOnce the agent starts, you'll see the following prompt:
Unset
Press 'K' to start/stop recording, 'Q' to quit.When you press 'K', the agent will begin recording. As you speak, your voice will be transcribed using OpenAI's Speech-to-Text model. When the lifecycle event detects that you've finished speaking, the agent will generate a response and play it back as synthesized speech.
Here’s a screenshot of an interaction between a user and the Voice Agent:
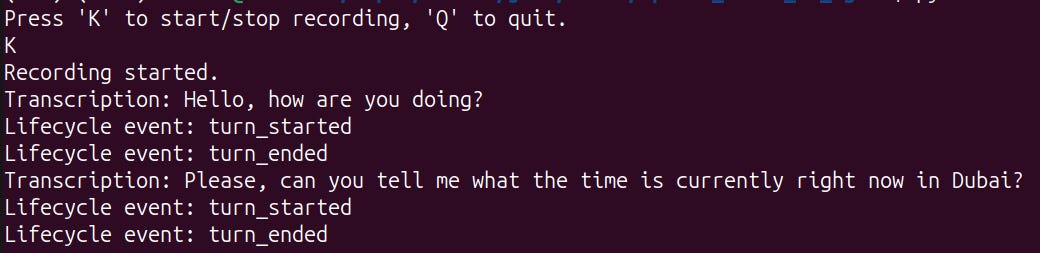
With that, we now have a fully functional Voice Agent!
Conclusion
Armed with the knowledge and starter code from this guide, you can take things even further by building more advanced Voice Agents tailored to specific use cases. For example, you could create:
Customer Service Agents – Handle inquiries, provide support, and resolve customer issues in real time.
Delivery Management Agents – Assist with order tracking, delivery updates, and logistics coordination.
Booking Assistants – Help users schedule appointments, book reservations, or manage travel plans.
The possibilities are endless. By customizing the workflow, integrating additional tools, and leveraging OpenAI’s powerful voice models, you can create highly interactive and intelligent Voice AI solutions for various applications.
Now it’s your turn to build something amazing! 🚀